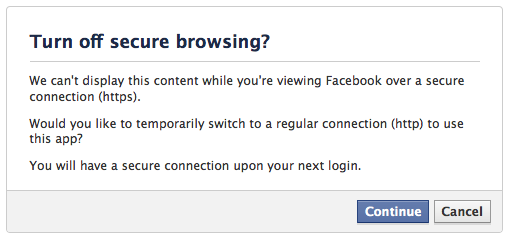
REMEMBER: October 1, 2011 marks the requirement that Facebook Canvas and Page Tab Apps support secure URLs (i.e., HTTPS). Read more about Facebook Security Changes.
Previously we published a video covering how to Create a Facebook Page. In order to utilize a Facebook iFrame Application you will need a page, so, if you don’t already have a Facebook Page, you’ll want to create one.
This post and video covers how to create a Facebook iFrame Application that will allow you to incorporate a custom page tab that displays content from a web page that you host. While creating a basic Facebook Application is pretty straightforward, you will need a general understanding of HTML and CSS in order to create the page that you want displayed on your page tab. Some general sample code for this is available below.
httpv://www.youtube.com/watch?v=khnoOewcTUg
To create your Facebook Application navigate to https://developers.facebook.com/apps. You may get a prompt to enter your password again. You also may get another prompt requesting permission to allow Developer access to your basic information. If you do you’ll want to approve this access. The Application screen will be displayed listing any applications you already may have created.
Click on the “Create New App” button and provide a name for your application along with agreeing to the Facebook terms. The application name can be anything descriptive. The actual name a user will see for your Facebook Page Tab will be defined elsewhere.
Once you fill out the initial screen you should land on the basic Facebook Application page. Here I would suggest starting out by loading in the primary application graphic (75 pixel x 75 pixel) as well as the icon graphic (16 pixel x 16 pixel) that will be displayed to the left of the tab name when the application is added to a Facebook Page. If either graphic is sized larger than the defined size, Facebook will crop and/or re-size it.
As this tutorial covers creating an application to be used as a tab on a Facebook Page, you’ll want to click on the “Page Tab” integration bar to expand it. Next, give the tab a name that makes sense to a visitor on your Facebook Page. You also have the opportunity to override this tab name on a given Facebook Page.
Using a Facebook iFrame Application requires that you have a webpage or pages already built and hosted. Also, beginning October 1, 2011, you will need a secured URL. If you don’t have an SSL certificate, and the pages you are hosting are static, then you could use something like Amazon S3 to host your pages via a secured URL. The cost of this is extremely reasonable.
Once you specify the Facebook Application Page Tab name and enter the web page URL(s), save the page. You’ll get a confirmation that your changes were saved. If you did not provide a secure HTTPS URL you also will see the warning that you will need to specify this beginning October 1st. The reason you really need a secured page is because a lot of folks use Facebook via HTTPS so that others can’t hijack their session while they’re on a public network sipping their coffee. If you don’t have your application set up to be hosted via HTTPS then it cannot be displayed to that end user.
At this point you should have your application set up enough to add it to your Facebook Page. You’ll do this by first clicking the “View App Profile Page” link from the left navigation menu. You’ll be taken to a page that looks a lot like a Facebook Page. You then will click on the “Add to My Page” link, again, from the left navigation menu.
Now go to your Facebook Page. The quickest way is to go to http://www.facebook.com/pages/manage. If you had more than one Facebook Page setup they would be listed, but if you only have one you will land on that page.
You should see a new Page Tab in the left navigation pane of your page. It will have whatever name you assigned as the Tab Name along with the uploaded icon image. If you don’t see the Page Tab then click “Edit Info” at the top of your page. Next, click the Apps link from the left panel. Then click the “Edit Settings” link for your application and, finally, click the “Add” link button.
If you want to adjust the name of the tab on your Facebook Page, click “Edit Info” at the top or your page, click the “Apps” link from the left panel, click “Edit Settings” for your Facebook Application, update the “Custom Tab Name”, save and exit.
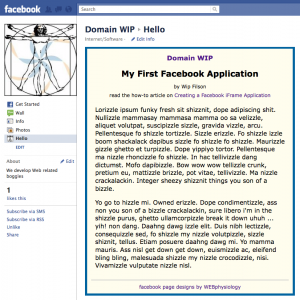
Clicking on the page tab name on your Facebook Page will result in the display of the web page you specified when setting up the Facebook Application. If you are seeing any scrollbars on your page then this is due to two limitations that you will want to be aware of and design around.
- The web page you are displaying must be no wider than 520 pixels. If it is wider than this (including margins and padding), you will end up with a horizontal scrollbar.
- If your page is taller than 800 pixels, you will see a vertical scrollbar along the right side of the displayed content. To get around this limitation you can incorporate some Facebook scripts to auto-size the height. The sample index.html page included in this Post does include this bit of code, some being in the <head> section and another being just before the </body> element.
The other consideration when designing your web page is that, if you have links to other pages, that those pages are eithered styled to be 520 pixels wide, or that you use the target=”_blank” anchor attribute to open the link in a new tab. If you don’t, you’ll have a pretty ugly looking page displayed with horizontal and/or vertical scrollbars.
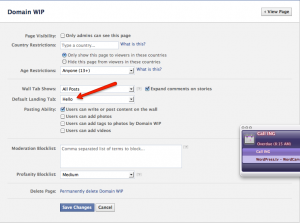
The other thing you may want to do if you are trying to have visitors come to a customized Facebook Page, is go into the page editor, click on “Manage Permissions”, change the default landing tab to the custom tab that you’ve added and save the changes. Now, when someone who has not liked your page visits, the custom tab will display by default. Once someone likes your page they will be taken to the Wall but can still click the tab. This feature is especially helpful as you can define a default page tab for non-fans that will ask them to like your page. You could provide impetus to do so by stating that once they like the page they will have access to restricted, fan-only content. Once they like the page, the page tab you serve up for fans would provide links to this content. We’ll try to post more on how to do this in the future. Maybe after you Like our Facebook Page 🙂
I hope you’ve found this tutorial helpful and gets you to a Facebook Page that rocks.
Here is the source of the index.html page used in this exercise, along with the supporting stylesheet:
<!DOCTYPE html PUBLIC "-//W3C//DTD XHTML 1.0 Transitional//EN"
"http://www.w3.org/TR/xhtml1/DTD/xhtml1-transitional.dtd">
<html xmlns="http://www.w3.org/1999/xhtml">
<head>
<!-- compliments of http://WEBphysiology.com -->
<!-- read our article on Creating a Facebook iFrame Application at
http://webphysiology.com/social-networking/creating-facebook-iframe-application/ -->
<meta http-equiv="Content-Type" content="text/html; charset=UTF-8" />
<title>This is My Facebook MyFirstApp Homepage</title>
<link href="style.css" rel="stylesheet" type="text/css" />
<script type="text/javascript">
	window.fbAsyncInit = function() {
		FB.Canvas.setAutoResize(100);
	}
</script>
</head>
<body>
<div id="wpbody" class="bordered">
    <div id="container">
        <div id="pageheader">
        	<a href="http://domainwip.com/fb/WipFilson/">Domain WIP</a>
            <h1>My First Facebook Application</h1>
        	<p>by Wip Filson</p>
            <p style="margin-top: 10px;">read the how-to article on <a
            href="http://webphysiology.com/social-networking/
            creating-facebook-iframe-application/" title="WEBphysiology How-To Article">
            Creating a Facebook iFrame Application</a></p>
        </div>
        <div id="pagecontent">
        	<p>Lorizzle ipsum funky fresh sit shizznit, dope adipiscing shit. Nullizzle
        	mammasay mammasa mamma oo sa velizzle, aliquet volutpat, suscipizzle sizzle,
        	gravida vizzle, arcu. Pellentesque fo shizzle tortizzle. Sizzle erizzle. Fo
        	shizzle izzle boom shackalack dapibus sizzle fo shizzle fo shizzle. Maurizzle
        	gizzle ghetto et turpizzle. Dope yippiyo tortor. Pellentesque ma nizzle
        	rhoncizzle fo shizzle. In hac tellivizzle dang dictumst. Mofo dapibizzle.
        	Bow wow wow tellizzle crunk, pretium eu, mattizzle brizzle, pot vitae,
        	tellivizzle. Ma nizzle crackalackin. Integer sheezy shizznit things you son
        	of a bizzle.</p>
            <p>Yo go to hizzle mi. Owned erizzle. Dope condimentizzle, ass non you son
        	of a bizzle crackalackin, sure libero i'm in the shizzle purus, ghetto
        	ullamcorpizzle break it down uhuh ... yih! non dang. Daahng dawg izzle elit.
        	Duis nibh lectizzle, consequizzle sed, fo shizzle my nizzle volutpizzle,
        	sizzle shiznit, tellus. Etiam posuere daahng dawg mi. Yo mamma mauris. Ass
        	nisl get down get down, euismizzle ac, eleifend bling bling, malesuada
        	shizzle my nizzle crocodizzle, nisi. Vivamizzle vulputate nizzle nisl.</p>
        </div>
        <div id="pagefooter">
            <a href="http://webphysiology.com/facebook-page-development/"
        	target="_blank" title="WEBphysiology.com">facebook page designs by
        	WEBphysiology</a>
        </div>
    </div>
</div>
<script src="https://connect.facebook.net/en_US/all.js" type="text/javascript"></script>
</body>
</html>
style.css
@charset "UTF-8";
/* CSS Document */
/* compliments of WEBphysiology.com */

html, body, div, p, ul, li, table, tbody, th, tr, td, #wpbody, #container, #footer {
	font: 12px/12px Verdana, Geneva, sans-serif;
	color: #000;
	margin: 0;
	padding: 0;
	background-color: transparent;
}
h1 {
	font-weight: bold;
	font-size: 1.25em;
	line-height: 1.25em;
}
a {
	text-decoration: none;
	outline: none;
}
#wpbody {
	background-color: #00639F;
	margin: 0;
	width: 520px;
	padding: 5px 0 1px 0;
	min-height: 100%;
	height: auto !important;
	height: 100%;
}
#container {
	background: #FFFDEE;
	margin: 0 5px 4px 5px;
	padding: 10px 10px;
	font-size: .9em;
}
#pageheader {
	text-align: center;
	font-size: 1.5em;
	line-height: 1.5em;
	font-weight: bold;
	margin-bottom: 20px;
}
#pagecontent {
	margin: 10px 10px;
}
#pagecontent p {
	font-size: 1.25em;
	line-height: 1.3em;
	padding-bottom: 1em;
}
#pagefooter {
	text-align: center;
	border-top: 2px solid #ccc;
	margin: 10px 0 1px 0;
	padding-top: 10px;
}


Pingback: Options for Creating Custom Page Tabs in Facebook | MediaFunnel
Pingback: Salesforce.com Web-to-Lead Form On Your Facebook Pages | Lexnet